PRODUCT DETAILS
We live in exciting times where we can create masterpieces with the Arduino and marvels with the Raspberry Pi. Where we can use technology as a canvas to create things that amaze and amuse our friends and family. Wouldn’t it be great if we could take the same technology that has been the staple of rocket scientists and put it in our creative arsenal? Without the need to become a rocket scientist or the headache of learning a new programming language like VHDL/Verilog.
Why can’t we just draw up the circuits that we want to use? With the right software and circuit libraries we can! Let’s put a full circuit lab on a chip, pair it with an easy to use Arduino-Compatible chip, and sprinkle in a generous helping of debugging tools.
Introducing the Papilio DUO – FPGA and Arduino-Compatible Chip Together at Last
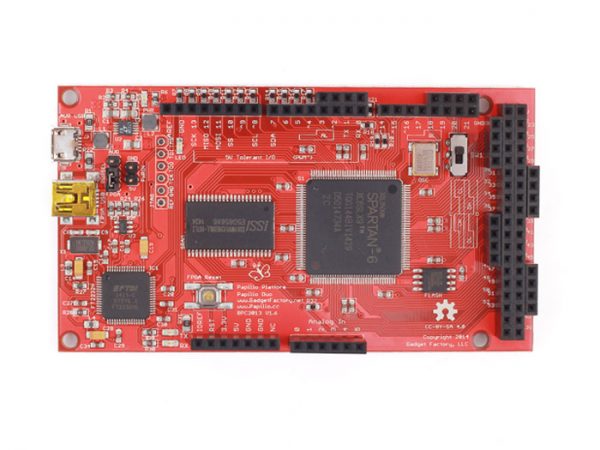
The Papilio DUO has an FPGA on the top and the same chip that is used in the Arduino Leonardo (ATmega32U4) on the bottom. It’s like having an Arduino with a full circuit laboratory connected to it!
FPGA Unleashed!
Our dream is to take the hardcore out of FPGA (Field Programmable Gate Array) and make it an amazing tool that anyone can use for creative technology projects.
Just like the Arduino team simplified C++ programming, we simplify FPGA design by providing easy to use drag and drop circuit libraries. We believe that drawing circuits will result in an amazing outpouring of creative FPGA projects!
Use the Papilio DUO to unleash your inner DaVinci. Draw and debug circuits on a chip without any soldering, breadboarding, or weird programming languages. Set your imagination free and put an FPGA in your creative arsenal!
Hardware
The Papilio DUO is a third generation Papilio board. As such, it benefits from all of the tricks we’ve learned along the way as well as extensive feedback from the community. This past experience and community feedback drove the development of this board and puts the users needs first.
Extensible – The first thing that people always ask for is the ability to use their Arduino shields. We listened and started with an Arduino-Compatible footprint, retained support for six Papilio Wings, and even squeezed in support for one PMOD connector! Adding new hardware to your FPGA has never been easier, there is a huge selection of hardware out there just waiting for you to discover.
SRAM – Easy to use SRAM is a must. We’ve used SDRAM in the past and it was a big mistake! The strict timing requirements and interfacing caused fits for everyone. SRAM is asynchronous and dead easy to use, you will greatly appreciate the simplicity of SRAM in your projects.
Features
Software and Features
The Papilio DUO is much more then just hardware. In fact, the software is the secret sauce that sets the DUO apart from other FPGA boards. It lets you draw up circuits without investing time and energy in learning VHDL/Verilog.
We start with the Arduino IDE (Integrated Development Environment) and supercharge it by adding circuits into the mix. We bring all of the pieces needed to draw and debug your very own circuits in one place. It’s an easy and seamless user experience that we call Papilio DesignLab for use with both Windows and Linux.
Papilio DesignLab
We start with the Arduino IDE but every sketch now has a circuit associated with it – editing and debugging circuits is just a click away!
Simply draw and debug your circuits!
Click on the “Edit Circuit” button and simply draw your circuits using the Xilinx ISE schematic editor and our Papilio Circuit Library.
Logic Analyzer
Drop a professional quality Logic Analyzer into any circuit and know instantly what it’s doing. Up to 32 channels and 200Mhz speed handles any circuit you can throw at it. Use up to 75KB of internal memory or the external SRAM memory.
System on Chip – Draw Soft Processor Circuits!
Want to get into more complex circuits? DesignLab includes the ZPUino Soft Processor with a Wishbone bus, providing greater speed and flexibility than the Arduino-Compatible chip. A Soft Processor runs inside the FPGA and uses the Wishbone bus to make it easy to connect peripheral circuits, such as UARTs, PWMs or SPI masters. Making your own Soft Processor with just the right mix of peripheral circuits is known as a SOC (System On Chip) design. With DesignLab you can draw your SOC designs in minutes!
Create SOCs with ten serial ports, or a PWM on every pin, or something exotic like classic Atari and Commodore audio chips connected at the same time. The sky is the limit, you can create things that don’t exist anywhere else!
Example of making your own SOC design with ZPUino and a Commodore 64 SID audio chip. (This tutorial was written for an earlier version of our software. DesignLab integrates circuits and sketches together for a much easier and seamless user experience.)
Specification
Hardware Specifications
A) Spartan 6 LX9 FPGA(Datasheet)
B) High efficiency LTC3419 Switching Voltage Regulator(Datasheet)
C) Dual Channel FTDI FT2232H USB 2.0 Interface (Datasheet)
D) 512KB or 2MB ISSI IS61WV5128 SRAM (Datasheet)
E) 64Mbit Macronix MX25L6445 SPI Flash (Datasheet)
F) Atmel AVR ATmega32U4 – Arduino-Compatible Chip (Datasheet)
G) 54 I/O pins arranged in an Arduino-Compatible Mega Form Factor
H) Digital Pins 0-16 Connected to FPGA and ATmega32U4
If you have any questions, feel free to send us an email to service.
For any technical support or suggestion, please kindly go to our forum.
Technical details
| Dimensions | 110mm x90mm x11.6mm |
| Weight | G.W 38g |
| Battery | Exclude |
ECCN/HTS
| HSCODE | 8543709990 |
| USHSCODE | 8471410150 |
| UPC | 841454105190 |
Papilio DUO-512KB
$97.00
Introduction: We live in exciting times where we can create masterpieces with the Arduino and marvels with the Raspberry Pi
Papilio DUO-512KB
$97.00
Introduction: We live in exciting times where we can create masterpieces with the Arduino and marvels with the Raspberry Pi
PRODUCT DETAILS
We live in exciting times where we can create masterpieces with the Arduino and marvels with the Raspberry Pi. Where we can use technology as a canvas to create things that amaze and amuse our friends and family. Wouldn’t it be great if we could take the same technology that has been the staple of rocket scientists and put it in our creative arsenal? Without the need to become a rocket scientist or the headache of learning a new programming language like VHDL/Verilog.
Why can’t we just draw up the circuits that we want to use? With the right software and circuit libraries we can! Let’s put a full circuit lab on a chip, pair it with an easy to use Arduino-Compatible chip, and sprinkle in a generous helping of debugging tools.
Introducing the Papilio DUO – FPGA and Arduino-Compatible Chip Together at Last
The Papilio DUO has an FPGA on the top and the same chip that is used in the Arduino Leonardo (ATmega32U4) on the bottom. It’s like having an Arduino with a full circuit laboratory connected to it!
FPGA Unleashed!
Our dream is to take the hardcore out of FPGA (Field Programmable Gate Array) and make it an amazing tool that anyone can use for creative technology projects.
Just like the Arduino team simplified C++ programming, we simplify FPGA design by providing easy to use drag and drop circuit libraries. We believe that drawing circuits will result in an amazing outpouring of creative FPGA projects!
Use the Papilio DUO to unleash your inner DaVinci. Draw and debug circuits on a chip without any soldering, breadboarding, or weird programming languages. Set your imagination free and put an FPGA in your creative arsenal!
Hardware
The Papilio DUO is a third generation Papilio board. As such, it benefits from all of the tricks we’ve learned along the way as well as extensive feedback from the community. This past experience and community feedback drove the development of this board and puts the users needs first.
Extensible – The first thing that people always ask for is the ability to use their Arduino shields. We listened and started with an Arduino-Compatible footprint, retained support for six Papilio Wings, and even squeezed in support for one PMOD connector! Adding new hardware to your FPGA has never been easier, there is a huge selection of hardware out there just waiting for you to discover.
SRAM – Easy to use SRAM is a must. We’ve used SDRAM in the past and it was a big mistake! The strict timing requirements and interfacing caused fits for everyone. SRAM is asynchronous and dead easy to use, you will greatly appreciate the simplicity of SRAM in your projects.
Features
Software and Features
The Papilio DUO is much more then just hardware. In fact, the software is the secret sauce that sets the DUO apart from other FPGA boards. It lets you draw up circuits without investing time and energy in learning VHDL/Verilog.
We start with the Arduino IDE (Integrated Development Environment) and supercharge it by adding circuits into the mix. We bring all of the pieces needed to draw and debug your very own circuits in one place. It’s an easy and seamless user experience that we call Papilio DesignLab for use with both Windows and Linux.
Papilio DesignLab
We start with the Arduino IDE but every sketch now has a circuit associated with it – editing and debugging circuits is just a click away!
Simply draw and debug your circuits!
Click on the “Edit Circuit” button and simply draw your circuits using the Xilinx ISE schematic editor and our Papilio Circuit Library.
Logic Analyzer
Drop a professional quality Logic Analyzer into any circuit and know instantly what it’s doing. Up to 32 channels and 200Mhz speed handles any circuit you can throw at it. Use up to 75KB of internal memory or the external SRAM memory.
System on Chip – Draw Soft Processor Circuits!
Want to get into more complex circuits? DesignLab includes the ZPUino Soft Processor with a Wishbone bus, providing greater speed and flexibility than the Arduino-Compatible chip. A Soft Processor runs inside the FPGA and uses the Wishbone bus to make it easy to connect peripheral circuits, such as UARTs, PWMs or SPI masters. Making your own Soft Processor with just the right mix of peripheral circuits is known as a SOC (System On Chip) design. With DesignLab you can draw your SOC designs in minutes!
Create SOCs with ten serial ports, or a PWM on every pin, or something exotic like classic Atari and Commodore audio chips connected at the same time. The sky is the limit, you can create things that don’t exist anywhere else!
Example of making your own SOC design with ZPUino and a Commodore 64 SID audio chip. (This tutorial was written for an earlier version of our software. DesignLab integrates circuits and sketches together for a much easier and seamless user experience.)
Specification
Hardware Specifications
A) Spartan 6 LX9 FPGA(Datasheet)
B) High efficiency LTC3419 Switching Voltage Regulator(Datasheet)
C) Dual Channel FTDI FT2232H USB 2.0 Interface (Datasheet)
D) 512KB or 2MB ISSI IS61WV5128 SRAM (Datasheet)
E) 64Mbit Macronix MX25L6445 SPI Flash (Datasheet)
F) Atmel AVR ATmega32U4 – Arduino-Compatible Chip (Datasheet)
G) 54 I/O pins arranged in an Arduino-Compatible Mega Form Factor
H) Digital Pins 0-16 Connected to FPGA and ATmega32U4
If you have any questions, feel free to send us an email to service.
For any technical support or suggestion, please kindly go to our forum.
Technical details
| Dimensions | 110mm x90mm x11.6mm |
| Weight | G.W 38g |
| Battery | Exclude |
ECCN/HTS
| HSCODE | 8543709990 |
| USHSCODE | 8471410150 |
| UPC | 841454105190 |


